
Flow tests are critical for ensuring your K&A oligonucleotide synthesizer delivers reagents consistently—this directly affects synthesis performance and overall data quality. This article walks you through how to run a flow test and what to look out for.
IT IS RECOMMENDED A FLOW RATE TEST IS PERFORMED MONTHLY AND LOGGED FOR FUTURE REFERENCE
A Sample Log Template can be downloaded here : Instrument Flow Rate Log

Why Flow Testing Matters
Flow testing helps you:
-
Confirm each valve is working and delivering liquid properly
-
Identify under-delivery or inconsistent flow
-
Catch system-wide issues early (like pressure problems or gas leaks)
-
Validate that all reagent lines, waste lines, and trityl monitor functions are operating as expected
Before You Start
Make sure:
-
All reagent lines are fully primed before testing
-
Your system is pressurized to the standard 0.04 -0.05 MPa for Argon (unless testing under alternate conditions)
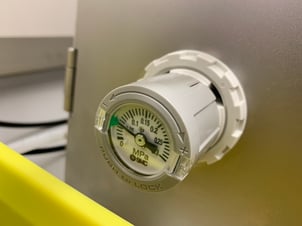
- Ensure your compressor is set to the standard 0.30-0.40 MPa

-
Waste lines are ready to collect liquid for measurement
-
You have collection vials or graduated cylinders on hand
Note: Flow volumes may vary slightly based on reagent viscosity, tubing diameter, and pressure.
Note: Compressor Pressure being too high or having a leak can also lead to flow test issues. Please ensure you are within the ranges stated above.
Step-by-Step Flow Test
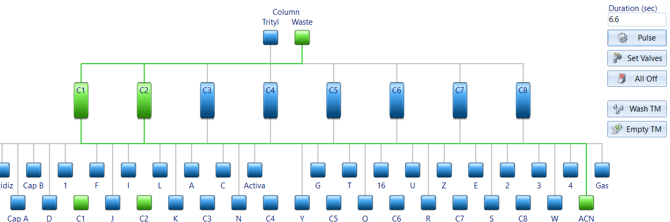
🔹 1. Test Liquid Valves Through Waste
-
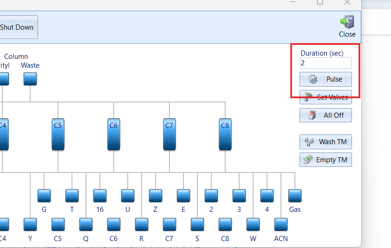
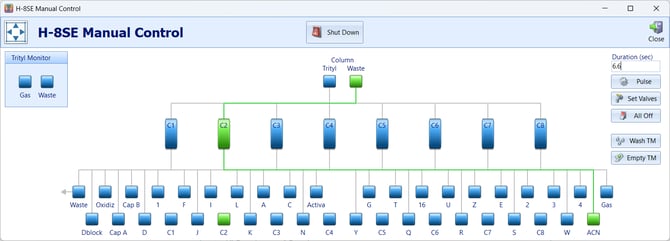
Fully prime each reagent line using your system’s software to ensure the reagent reaches the manifold if it the liquid lines are not currently filled with reagent. This can be done via the Manual Control Screen. A 1-2 Second pulse is usually sufficient.

- Purge gas through the manifold waste line to remove any excess reagent from the manifold when done

- Decide which bottle position you would like to perform a flow test
- Place the Waste Lines in a collection vial or beaker
- Prime the Reagent via the software to ensure that the waste line is filled with the bottle position you will be testing. A 1-2 second "Pulse" is usually sufficient.
- Discard any reagent that may have been collected during priming
-
With the line now fully primed and securely in the collection vial, fire each valve manually for 6.6 seconds.

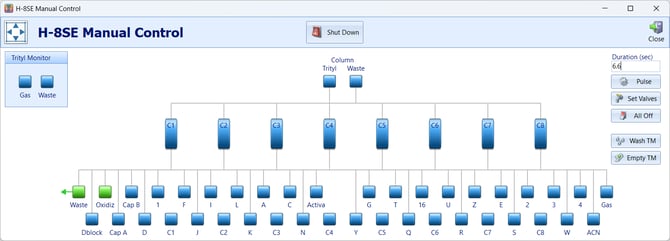
6.6 seconds is recommended but generally any length of time can be used.
-
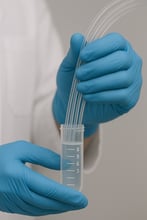
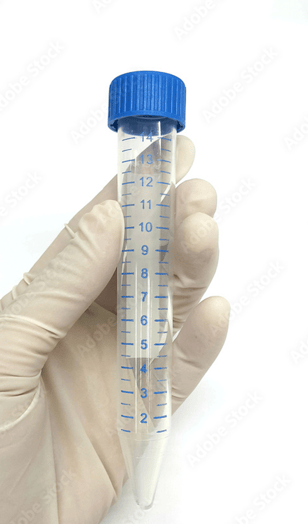
Collect the output in a graduated collection tube or vial.
-
Measure and record the delivered volume for each position in a spreadsheet or document.
-
Compare volumes across similar valve types to check for outliers or under-delivery.
Expected Volumes at 0.04 MPa:
-
Standard system: ~1.5 mL–2.5 mL
-
Viscous reagents: ~1.0 mL–2.0 mL
-
VLS systems (larger ID tubing): ~2.5 mL–4.5 mL
Note: Although this is generally what we would expect it is more important that the deliveries are consistent rather than that they match the values above
-
- It is recommended that these values are logged for future comparison and troubleshooting
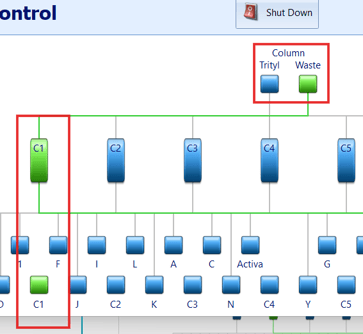
🔹 2. Test Each Column’s Waste Line with ACN
- Ensure you have empty spacers or columns in each column position
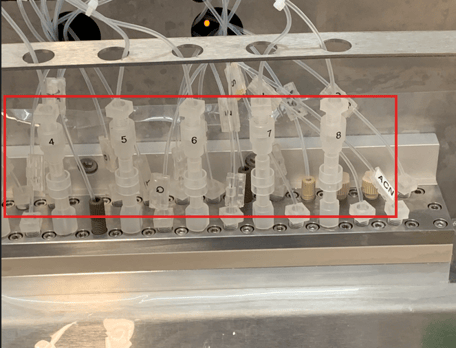
- Place the Column Waste Lines in a collection vial if not done so already
- Prime ACN through each Column to identify which column waste line you are looking at and to prime the line. A 1-2 second "Pulse" is usually sufficient.
-
Fire ACN through each column’s waste line for 6.6 seconds.
6.6 seconds is recommended but generally any length of time can be used.
-
Measure and compare the volume collected from each individual line.
- Measure and compare the volume collected when both Column 1 and Column 2 are pulsed at the same time. This portion of the test is crucial for instruments that function in two column mode.
- It is recommended that these values are logged for future comparison and troubleshooting
Expected Volumes at 6.6 Seconds:
• Standard systems: ~2.0 mL (3.0 to 3.5ml during Step 6)
• VLS systems: ~4.0+ mL ( 6.5 to 7.5ml during Step 6)
This test helps verify even flow across synthesis positions.
🔹 3. Trityl Monitor Wash Function
! For the Next 2 Sections Please Refer to The Testing Trityl Monitor Flow Video !
-
Run the “Trityl Monitor Wash” function inside the Manual Control Screen
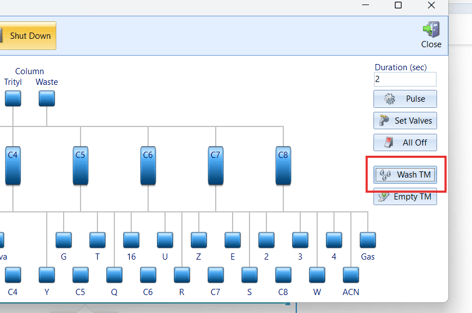

-
Visually inspect each trityl vial to ensure the ACN level appears uniform across all positions.
You’re checking for symmetry in rinse volume—if one vial looks dry or barely rinsed, it may point to a clogged line or faulty valve.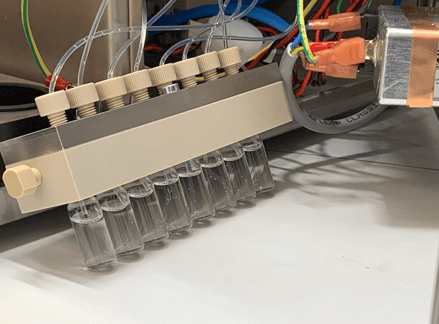
🔹 4. Empty Trityl Monitor Function
-
Run the “Empty Trityl Monitor” function.
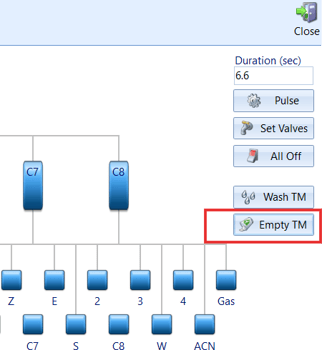
-
Visually confirm that all vials are emptying at roughly the same rate.
This helps validate that gas to the trityl monitor vials and the waste evacuation pathways are working properly.
Troubleshooting Flow Issues
For the following section you may have to refer to the following videos:
- K&A - How To Replace a Valve
- K&A - How To Clear a Line
- K&A - Fluid Leaks
- K&A - Membrane Replacement
- K&A - Troubleshooting Gas Leaks
| Symptom | Possible Cause | Solution |
|---|---|---|
| One valve under-delivers or doesn't flow |
Clogged or failing valve, clogged liquid line or bottle leak at that position. |
Replace valve. Unclog line. Replace Bottle Cap or address any gas leaks if suspected. |
| Several lines or valves deliver inconsistent amounts even after valve replacement | Compressor pressure too high or membrane needs replacement | Check compressor pressure(recommended range is 0.35MPa-0.40Mpa), gas lines and replace membrane as a last resort. |
| All lines deliver low volume | Argon pressure may be too low or there is an argon gas leak | Inspect for pressure leaks or increase pressure if necessary (0.04Mpa recommended but sometimes higher may be needed) |
| Flow degrades over time | Argon pressure may be too low | Inspect for pressure leaks or increase pressure if necessary (0.04Mpa recommended but somtimes higher may be needed) |